Summary
Configure Outlook to send automatic email replies to Stonehill users, emails from outside our organization, or both.
Body
Configure Outlook to send automatic email replies to Stonehill users, emails from outside our organization, or both.
Out-of-Office Replies on Windows
Turn on automatic out-of-office replies on Windows
- Select File > Automatic Replies (Out of office).

- In the Automatic Replies box, select Send automatic replies.

- Place a check in the box near Only send during this time range to set a date range for your automatic replies.

- This will turn off automatic replies at the date and time you enter for the end time. Otherwise, you'll need to turn off automatic replies manually.
- On the Inside My Organization tab, type the response that you want to send to other Stonehill users while you are out of the office.

- Select the Outside My Organization tab if you'd like to send an automatic reply to emails from outside Stonehill.

- Sending automatic replies to anyone outside my organization will send your automatic reply to every email, including newsletters, advertisements, and potentially, junk email.
- If you want to send automatic replies to those outside your organization, we recommend choosing My contacts only.
- Select OK to save your settings.
Back to Top
Turn off automatic out-of-office replies on Windows
- When Outlook is setup to send automatic replies, you'll see a message under the ribbon with this information.

- Select Turn off to disable automatic out-of-office replies.
Note:If you want to modify the dates for your automatic reply or the message sent, use the steps above to modify your settings.
Back to Top
Out-of-Office Replies on Mac
Turn on automatic out-of-office replies on the Mac
- At the bottom left corner of the navigation pane, click Mail.

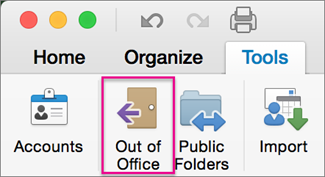
- On the Tools tab, click Out of Office.

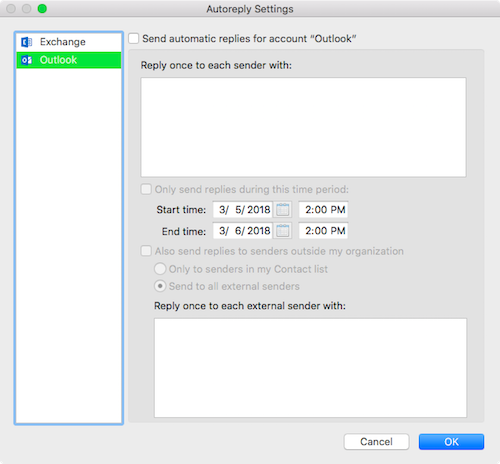
- In the Autoreply Settings box select the account on the left you want to setup the out-of-office reply, check the Send automatic replies for account "X" box (where "X" is the account you'd like to send out of office replies from).

- Under Reply once to each sender with, enter the message you want to automatically reply with.
- To set the start and end dates, select the Only send replies during this time period check box, and enter the start and end dates and times.
- Note: When you check this box and set start and end dates and times, your out-of-office replies will turn off automatically when the end date and time occur.
- To set options for replying to people outside your organization (if it is enabled by your Exchange administrator), check the Also send replies to senders outside my organization box, select Send to all external senders, and under Reply once to each external sender with, enter your automatic reply.
- Click OK.
Back to Top
Turn off automatic out-of-office replies on the Mac
- At the bottom left corner of the of the navigation pane, click Mail.

- On the Tools tab, click Out of Office.

- Clear the Send automatic replies for account "X" box (where "X" is the account you'd like to turn off Out of Office replies for).
Back to Top
Out-of-Office Replies on the Outlook Web App
Turn on automatic out-of-office replies on the Outlook Web App
- Log into Office 365 from office365.stonehill.edu, making sure you are accessing the Mail section (not Calendar, People, etc.).
- Select the gear [1] icon in the upper right corner of your OWA window. Then, click View all Outlook settings button [2].

- In the Settings window that displays, select Automatic Replies [1] from the center column.

- Click on the slider button to Turn on automatic replies [2].
- The slider button will change color to green and the text will inform you that Automatic replies on [1].

- If you want to set a time limit for replies, check the option Send replies only during a time period [2] and designate a start and end time for your response.
- With this option selected, you will see the options to Block my calendar for this period, Automatically decline new invitations for events that occur during this period, and/or Decline and cancel my meetings during this period [3].
- If you don't select a period for the replies to be sent, they will begin to be sent immediately.
- To send an automatic reply to anyone outside our environment, select the check box for Send replies outside your organization [4], then decide whether to select Send replies only to contacts [5].
- Fill in the text of your automatic reply and click the Save button [6].
- An Automatic replies notification message [1] will be displayed in the window's top-right corner.

- Click the Turn off [2] link to disable them, or close out of the window by clicking on the X [3].
Back to Top
Turn off automatic out-of-office replies on the Outlook Web App
- Log into Office 365 from office365.stonehill.edu, making sure you are accessing the Mail section (not Calendar, People, etc.).
- Select the Settings Gear Icon in the upper right corner of your OWA window.

- In the Settings window that displays, select Automatic Replies [1] from the center column.

- Click on the slider button where it says Automatic replies on [2] to toggle the switch off.
- The slider button will change color from green to white, and the text allows you to Turn on automatic replies [1].

- Click the Save button [2].
Back to Top