Summary
A Rubric is an assessment tool for communicating expectations of quality. They are comprised of rows and columns that define the criteria being used and the levels of performance for each criterion. They can be added to assignments, quizzes and graded discussions.
Body
A Rubric is an assessment tool for communicating expectations of quality. They are comprised of rows and columns that define the criteria being used and the levels of performance for each criterion. They can be added to assignments, quizzes and graded discussions.
Creating, Viewing, or Editing a Rubric
Creating a Rubric
- In the Course Navigation, click the Rubrics link.
- Click the +Create New Rubric button.
- Enter a Name.
- Click the Draft New Criterion button.
- For your criterion, enter:
- Name
- Criterion Description
- Points Possible
- Edit Rating Names as needed
- Rating Descriptions
- Change the points as needed, check the Enable Range box if you want to score in a range.
- You can add more ratings by hovering the mouse in-between ratings and clicking the purple + button that appears.
- Delete ratings using the trash can icon
- ratings can be re-ordered via drag-and-drop

- Click Save Criterion when ready.
- Use the same method to add additional criteria.
- Criteria can be re-ordered via drag-and-drop.
- Click the Preview Rubric button to see what the finished rubric will look like.
- When finished, click Create Rubric.
Back to Top
Viewing or Editing a Rubric
- In the Course Navigation, click the Rubrics link.
- Click the desired rubric to view. You can choose three view modes:
- Traditional
- Horizontal
- Veritcal
- To edit, click the three dots in the Actions column and select Edit.
- When finished editing, click the Save Rubric button.
Back to Top
Adding a Rubric to an Assignment
You can only add a rubric to assignments that use the Online, On Paper, or No Submission submission types.
- Access the course and locate and click on the assignment.
- You can create a new rubric from this page or click Find Rubric to search for an existing one:

- Click on the course name that has the existing rubric in the drop-down menu [1], select the circle next to the rubric [2], click +Add [3].
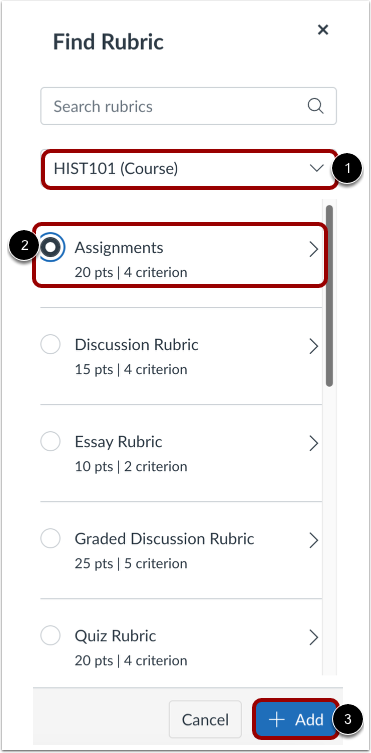
- The rubric will now be added to the assignment.
- If you want to use the rubric to calculate a grade, click the pencil to edit the rubric, check the Use this rubric for assignment grading box, and click Save Rubric.
Notes:
- If you enable Use this rubric for assignment grading, if the rubric's point total don't match the assignment's, it will warn you and ask if you want to change the assignment to match the rubric.
- If you don't enable Use this rubric for assignment grading, you can still fill out the rubric when grading, but the score won't be automatically tallied and entered in the grade box for you.
Back to Top
Adding a Rubric to a Quiz
- In the course navigation, click the Quizzes link.
- Click on the Name of your quiz.
- At the bottom of the page, you can create a new rubric or click Find Rubric to search for an existing one:
- Click on the course name that has the existing rubric in the drop-down menu [1], select the circle next to the rubric [2], click +Add [3].
- The rubric will now be added to the quiz.
- If you want to use the rubric to calculate a grade, click the pencil to edit the rubric, check the Use this rubric for assignment grading box, and click Save Rubric.
Notes:
- If you enable Use this rubric for assignment grading, if the rubric's point total don't match the assignment's, it will warn you and ask if you want to change the assignment to match the rubric.
- If you don't enable Use this rubric for assignment grading, you can still fill out the rubric when grading, but the score won't be automatically tallied and entered in the grade box for you.
Back to Top
Adding a Rubric to a Graded Discussion
- In the course navigation, click the Discussions link.
- Click on the desired discussion.
- Click the three dots in the top-right corner and select Add Rubric:

- You can create a new rubric from this page or click Find Rubric to search for an existing one.
- Click on the course name that has the existing rubric in the drop-down menu [1], select the circle next to the rubric [2], click +Add [3].
- The rubric will now be added to the discussion.
- If you want to use the rubric to calculate a grade, click the pencil to edit the rubric, check the Use this rubric for assignment grading box, and click Save Rubric.
Notes:
- If you enable Use this rubric for assignment grading, if the rubric's point total don't match the assignment's, it will warn you and ask if you want to change the assignment to match the rubric.
- If you don't enable Use this rubric for assignment grading, you can still fill out the rubric when grading, but the score won't be automatically tallied and entered in the grade box for you.
Back to Top
Grading With a Rubric in SpeedGrader
- Access the assignment, graded discussion, or quiz build area and click SpeedGrader:
- There are three View Modes you can select from the drop-down menu:
- Traditional
- Horizontal
- Vertical
- Choose your preferred view, if the rubric is too small, you can expand it by dragging the gray bar next to the rubric panel to the left. Select the rating for each criterion. If you enabled a score range, adjust the point value in the Points field for that criterion.
- If in Traditional view, click the Speech bubble button under to leave feedback for that particular rating.
- You can also add a comment in the Add a comment field at the bottom.
- When finished click Submit.
Back to Top