Zoom allows you to configure various settings and features to keep your meeting secure and "zoombombers" out. For larger public meetings, we recommend that at minimum you do the following:
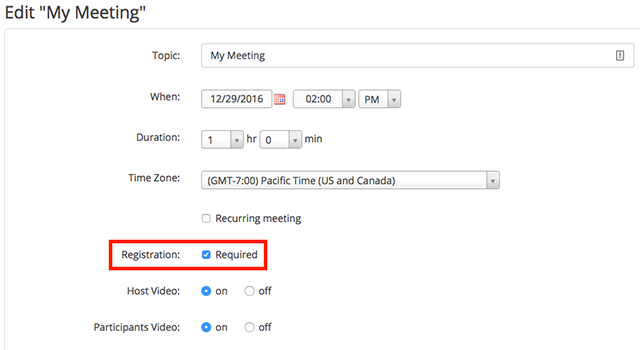
- Require registration
- Enable the Waiting Room
- Enable a Password
- Mute Participants Upon Entry
- Don't allow Participants to unmute themselves
- Turn off Chat
- Disable Screen Annotations
For large meetings, plan to join your meeting about 30 minutes before admitting participants to ensure that these options are set.
Pre-Meeting Options
Secure your Zoom Meetings before your event even begins, by configuring these pre-meeting features. These features are accessible when clicking the "Schedule" button in the Zoom application.
Meeting Password
Enable a password (aka "passcode") in order to access your meeting. This feature can be applied to both your Personal Meeting ID (so only those with the password will be able to reach you), and to newly scheduled meetings. Be aware that anyone who has the full link with the password can join your meeting, so you should not share a meeting link publicly, particularly on social media. You can also require password for participants joining by phone. Check here to learn all the ways to add a password for your meetings.
Back to Top
Waiting Room
One of the best ways to secure your meeting is to turn on Zoom’s Waiting Room feature. When using your Stonehill Zoom account, this feature is turned on by default. The waiting room provides a virtual space for your attendees to join before entering the actual meeting, whether they join before or during the meeting, and allows you to admit individual participants into the meeting at your discretion.
As meeting attendees arrive, Zoom will notify you and provide you a list of those in the meeting, and those still in the waiting room, so you have total control of who joins your meeting.
Learn more about Waiting Rooms.
Don’t Use Personal Meeting ID for Public Meetings
Your Personal Meeting ID (PMI) is the default meeting that launches when you start an ad-hoc meeting. Your PMI doesn’t change unless you change it yourself, which makes it very useful if people need a way to reach you. But for public meetings, you should always schedule new meetings with randomly generated meeting IDs. That way, only invited attendees will know how to join your meeting! You can also choose to turn off your PMI when starting an instant meeting in your profile settings.
Back to Top
Other options
Best practice is to enable these options when scheduling a meeting ("Schedule" button in the Zoom app):
- Check the box to Mute participants on entry
- Set default participant video option to "Off"
Back to Top
In-Meeting Options
Zoom puts all your essential security options in a single "Security" button in the in-meeting menu. In this menu, you’ll be able to:
- Lock your meeting and prevent any new participants from joining
- Enable the Waiting Room on the fly, to help manage new meeting participants and be able to control any sharing and chat permissions of individuals and all attendees.
- Disable participant's abilities to:
- Share their screen
- Chat
- Unmute themselves
- Rename themselves
- Remove participants from the meeting entirely
Advanced Sharing Options
Click the up-carat next to the Share Screen button to access the following options:


Back to Top
Chat
Click the Chat button to display the chat, then click the "meatball menu" (▪▪▪) button to set the Chat Box to Participant Can Chat with Host only:

More in-meeting options
Check out Zoom's handy guide for more options available from within the meeting screen, and scroll to your particular device to find step-by-step instructions.
Back to Top
Access all meeting options
All these options and much, much more are available in your Zoom profile itself. To access these all in one place, and to configure default settings for all types of meetings, head to https://stonehill.zoom.us/profile/setting and login with your full Stonehill email address and password. Here, you'll be able to access Security, Scheduling, and Meeting settings as well as others like Email Notifications, snapshot settings, and more.

Back to Top
Annotations
One of the options configurable here is Annotations. Meeting participants can annotate on a shared screen as a viewer or the one that started sharing your screen. You can also use annotation tools when sharing or viewing a whiteboard. We recommend disabling this option for larger or public meetings:

Back to Top
Registration
Scheduling a meeting that requires registration will allow participants to register with their e-mail, name, other questions, and custom questions. You can also generate meeting registration reports if you want to download a list of people that registered.
To enable registration:
- Sign in to the Zoom web portal.
- In the navigation menu, click Meetings.
- Schedule a New Meeting or edit an existing meeting.
- In the Registration section, make sure to select the Required check box.

After scheduling the meeting, the Registration and Branding tabs will appear.
- Manage attendees: Click View to see a list of people that have registered for the meeting. Clicking on the registrant's name will provide additional info about that person.
Check Zoom's guide to registration for more options for customizing your registration.
Back to Top