As an instructor, you can add discussions and modify discussion settings on the Discussion Index page, which allows you to view all the discussions within a course. Discussions can be graded or ungraded.
Create a Discussion
- In Course Navigation, click the Discussions link.

- Click the +Add Discussion button.

- Add a title for your discussion in the Topic Title field [1].

- Use the Rich Content Editor (the RCE) to add discussion content [2].
- The Rich Content Editor includes a word count display below the bottom right corner of the text box [3].
Back to Top
Set Anonymous Discussion Options
By default, discussions are not anonymous; student names and profile pictures display in discussions [1].

To allow students to decide whether to display their names and profile pictures, click the Partial: students can choose to reveal their name and profile picture option [2].
To enable anonymous discussions and hide student names and profile pictures, click the Full: student names and profile pictures will be hidden option [3].
Notes:
- Anonymous discussions do not support graded discussions or group discussions.
- If there are no discussion submissions, you can edit the anonymous discussion options.
Add Discussion Options

To only allow replies to the discussion topic and prevent users from replying to replies, click the Disallow threaded replies checkbox [1].
To require users to reply to the discussion before they can see any other replies, click the Participants must respond to the topic before viewing other replies checkbox [2].
To enable a discussion podcast feed, click the Enable podcast feed checkbox [3].
To create a graded assignment, click the Graded checkbox [4]. When creating a graded assignment, additional options display, where you can select a number of points, add peer reviews, and select other options. Learn more about creating a graded assignment for everyone, individual students, course sections, or course groups.
To allow users to like discussion replies, click the Allow liking checkbox [5].
To add an ungraded discussion to the student to-do list, click the Add to student to-do checkbox [6]. Student to-do items display in the course calendar, in the student-specific List View Dashboard, and in the global and course home page to-do lists. Graded discussions automatically display in a student's to-do list.
To make the discussion a group discussion, click the This is a Group Discussion checkbox [7].
Notes:
- Graded discussions do not support anonymous grading.
- Graded discussions cannot be anonymous; student names and profile pictures must be visible to other members of the course.
Back to Top
Create a Graded Discussion
To create a graded discussion, click the Graded checkbox. If this option is selected, additional options will be added to the page, where you can assign graded discussions to everyone, individual students, course sections, or course groups.

Back to Top
Enter Grading Details
Enter the number of Points Possible [1].

Select the Grading Type [2] and Assignment Group [3], and assign Peer Reviews [4], if any.
Back to Top
Assign to Everyone, and Edit Due/Availability Dates
By default, Canvas will assign your graded discussion for everyone in your course, but this can be changed in the Assign to field [1].

In the date fields, add your preferred date(s) with the following options:
- Due [2]: Set the date and time that the graded discussion is due. The due date will already be populated for you if you created a discussion shell, but you can change it if necessary.
- Available From [3]: Set the date and time when the discussion will become available.
- Until [4]: Set the date and time when the discussion will no longer be available.
Back to Top
Create Multiple Due Dates with Discussion Checkpoints
When creating a graded discussion, instructors can set multiple due dates or checkpoints to accommodate different stages of the discussion process, such as replying to the initial post and follow-up replies. This feature allows for more structured participation, ensuring students meet deadlines for each required step in the discussion.
Please note that Discussion Checkpoints are not currently supported in ungraded Discussions.
To enable Discussion Checkpoints:
- Create a new Discussion or edit an existing one.
- In the Discussion settings, ensure the Graded box is checked [1], then check the Assign graded checkpoints box [2].

- A Checkpoint Settings area will display, where you can assign points to the initial post for students to Reply to Topic [3]. the number of additional required replies (reply to topic, reply to others) [4], and the points available for the additional reply [5]. All points are calculated automatically and listed as the Total Points Possible [6].

- Finally, use the Assignment Settings to add due dates for a reply to the initial post [7] and required replies [8].

- When a Discussion with Discussion Checkpoints is added to a module, students can view all due dates and the number of replies required for a discussion.

Save and Publish
If you are ready to publish your discussion, click the Save & Publish button [1].

If you want to create a draft of your discussion and publish it later, click the Save button [2].
Back to Top
Grading Discussions
- In Course Navigation, click the Discussions link.
- Click the name of a discussion to open it.
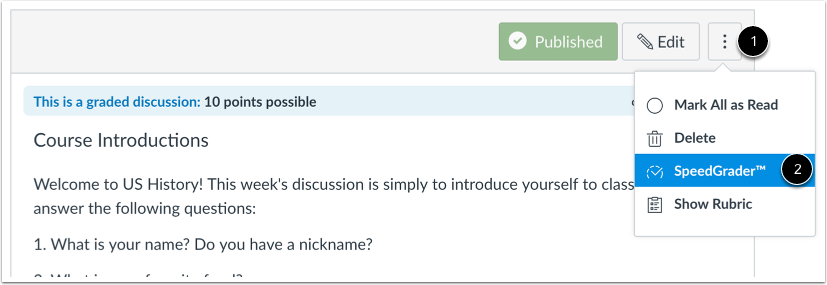
- Click the Options buttion [1], then select Speedgrader [2]
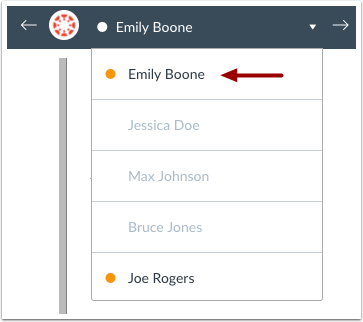
- Select a student from the student list
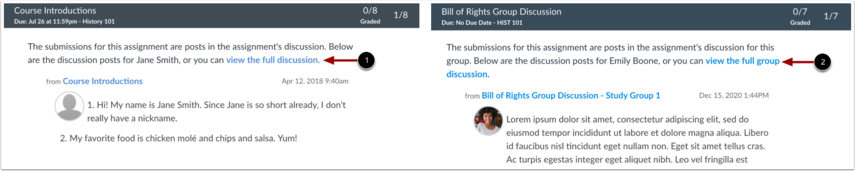
- The student's submission will be displayed. If you want the full context of the discussion, click the view the full discussion link [1] or view the full group discussion link [2]
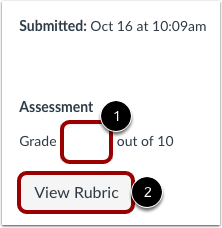
- Enter a grade in the Grade field [1], if the discussion has a rubric added, click View Rubric [2] to view it.
- If you enabled discussion checkpoints, you can enter a grade and/or status for each component: initial post and required replies.

In SpeedGrader, the individual post is highlighted [1], for easy identification. Instructors can navigate between responses using the Previous and Next Reply buttons [2]. Separate fields are provided to enter grades for both the individual response [3] and additional replies [4]. Additionally, instructors have the option to update the status for each reply field [5].
The points for initial post and required replies are then totaled automatically. You still only have one comments box, and the discussion will only show as one column in the Canvas Gradebook.
Additionally, you may choose to use a rubric on a discussion with checkpoints. If you do, you will still have to manually enter the point values for each part of the discussion, as these do not currently auto-populate from the rubric scores.
The Discussions Index Page
The Discussion Index page allows you to view all the discussions within a course. As an instructor, you can add discussions and modify discussion settings.
View the Discussions Index Page
- In Course Navigation, click the Discussions link.

- The Discussions Index page is designed with global settings at the top of the page [1], followed by the Discussion groups [2].

- Individual discussions are nested within each Discussion group [3].
Back to Top
View Global Settings
Global settings include a drop-down menu to filter all or unread discussions [1] and a search field for searching discussions [2].

You can also add a new discussion [3] and edit discussion settings [4].
Back to Top
View Discussion Groups
Discussion groups can be expanded and collapsed by clicking the arrow next to the name.

Discussions are organized into three main areas:
- Discussions.
- These are current discussions within the course.
- Discussions can remain open indefinitely, or you can specify a date range (as designated by the available from/until date).
- Discussions with replies are ordered by most recent activity.
- Discussions with no replies are ordered by creation date. Students will only see this section heading if there are discussions within this section.
- Pinned Discussions.
- These are discussions that you want your students to see at the top of their page.
- Pinned discussions can be arranged in any order.
- Students will only see this section heading if there are discussions within this section.
- Closed for Comments.
- These discussions have been manually closed for comments, or the discussion is past the available from/until date.
- These are discussions that are only available in a read-only state.
- Closed for comments discussions are also ordered by most recent activity.
- Students will always see this section heading, even if there are no discussions within this section.
For more information, please visit the Canvas How do I use the Discussions Index Page? article.
Back to Top
View Individual Discussion
Each discussion displays: the name of the discussion [1], the date on which the last discussion reply was posted [2], the number of unread/total posts in the discussion [4], the discussion state (published or unpublished) [5], and whether or not you are subscribed to the discussion [6]. You can also view availability dates for graded and ungraded discussions [7].

The unread icon next to a discussion indicates an unread discussion [8]. You can also view which sections are assigned to a discussion [9]. The number of unread/total posts is not included for group discussions and discussions with no discussion replies [10]. The peer review icon [11] also displays if a graded discussion has been assigned peer reviews.
You can also set varied due dates for a discussion and create due dates according to course section. Discussions with varied due dates show the latest due date.
Notes:
- Due dates are not required for discussions.
- Graded discussions with discussion replies cannot be unpublished. This is indicated by the publish icon being lighter in color.
Back to Top
View Availability Dates
Discussions can also include availability dates. Availability dates can make a discussion available for only a specific period of time.

Back to Top
Manage Individual Discussion
To manage an individual discussion, click the Options icon [1].

From the options drop-down menu, you can Edit the discussion, as well as close the discussion for comments [2], pin or unpin the discussion [3], duplicate the discussion [4], send the discussion to another instructor [5], copy the discussion to another course [6], share to the Commons [7], or delete the discussion [8].
Back to Top
View Discussion
To view discussion details and replies, click the name of the discussion.

Back to Top
View Student View
To view the discussions index page as a student, click the Student View button.

Note: If the course navigation link for the page is disabled and hidden from students, the Student View button does not display.
Back to Top