Learn how to use the Clear Touch, an interactive touchscreen computer.
Sign in to the Clear Touch
- Touch anywhere on the screen or the power button on the lower right of the panel.

- Log on with your Stonehill credentials by touching or clicking into the text boxes [1] and typing with the Clear Touch keyboard [2] or using the external keyboard and mouse [3] at the podium.

- Once logged in, use the Clear Touch the same way you would use any Windows computer. However, in addition to a keyboard and mouse interface, you can tap anywhere on the screen to navigate the Windows environment.
- DVD players are located on the back of the panel.
Back to Top
Connect a Laptop to the Clear Touch
- Touch anywhere on the screen or the power button on the lower right of the panel to ensure the Clear Touch is on.
- To connect your laptop to the Clear Touch, locate the HDMI cable attached to the rear or right of the panel.

- Connect the HDMI cable to your laptop's HDMI port [1].

- Once connected, the Clear Touch will automatically (approximately 5 seconds) switch inputs to your device.
Back to Top
Using EasiNote on the Clear Touch
- Double-click the Note icon on the Desktop.


- Using the Stylus, write on the screen the same way you would on a whiteboard.
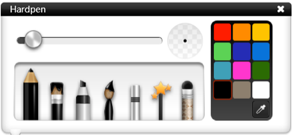
- To adjust the thickness or color of the stylus double-click the pencil icon at the bottom of the screen.

- To adjust the thickness, move the slider from left to right.
- To change the color of the marker, select a different color.
- To erase, use the side of your hand to swipe across the panel.
 |
 |
 |
 |
 |
 |
 |
 |
| Select |
Write |
Erase |
Shapes |
Move |
Handwrite |
Undo |
Redo |
Back to Top
Switching between EasiNote and the PC
- Touch the Display icon in the lower left-hand corner of the screen to switch from Note to the PC.


- Touch the Note icon [1] on the Note Sidebar [2] on the PC to switch from the PC to Note.

- Use the Move icon [3] to move the Note Sidebar [2] around the Clear Touch screen.
Back to Top
Saving and Exporting Content with EasiNote
- Touch the menu icon [1] in the lower left-hand corner of the screen.

- To save the note, select File [2] > Save [3], Name the note, and save it to the desired location.
- To export the note, select Export [4] > PDF [5], Name the note, and save it to the desired location.

Back to Top
Switching from Android to PC
If, while using the ClearTouch, you inadvertently find yourself in an environment that is not a Windows operating system or the EasiNote application, then you have stumbled into the Android side of the ClearTouch.
If your ClearTouch doesn't have a phsical settings button next to the power button follow the steps below to return to the Windows PC environment:
- Click the Setting button on the ClearTouch to bring up the input menu.

- Click the input labeled PC to switch to the Windows environment again.

If your ClearTouch doesn't have a physical settings button next to the power button follow the steps below to return to the Windows PC environment:
- Place your finger on the ClearTouch screen, just above the ClearTouch logo [1] at the bottom of the display, and swipe up.

- The General Setting menu [2] will appear on the screen when you swipe up with your finger. You'll notice that the Android source icon [3] has a green circle around it, indicating that it is the selected source.
- Tab on the PC icon [4] to select the PC source and to return to the Windows environment.

Back to Top