Note: Only OneDrive files/folders can be encrypted. You cannot encrypt files/folders in SharePoint.
If you would like to password-protect a single file in M365, or encrypt an entire folder of files, please follow the steps below:
On Windows
On Mac
Password-Protect Office 365 Files on Windows
Password-protect a Microsoft Word document.
- Open the Microsoft Word document you would like to protect.
- Click the File menu, select the Info tab, and then select the Protect Document button.
- Select Encrypt with Password from the drop-down menu.
- Enter your password, re-enter your password, and then click the OK button.

Back to Top
Open a password-protected Microsoft Word document.
- Navigate to and open the password-protected Microsoft Word file you want to open.
- Word will launch, and you will be prompted to Enter a password to open file in the Password window.
- Enter the password you set for the file, and click the OK button.

Back to Top
Password-protect a Microsoft Excel spreadsheet.
- Open the Microsoft Excel spreadsheet you would like to protect.
- Click the File menu, select the Info tab, and select the Protect Spreadsheet button.
- Select Encrypt with Password from the drop-down menu.
- Enter your password, re-enter your password, and then click the OK button.

Back to Top
Open a password-protected Microsoft Excel spreadsheet.
- Navigate to and open the password-protected Microsoft Excel spreadsheet you want to open.
- Excel will launch, and you will be prompted to Enter a password to open file in the Password window.
- Enter the password you set for the file, and click the OK button.

Back to Top
Password-protect a Microsoft PowerPoint presentation.
- Open the Microsoft PowerPoint presentation you would like to protect.
- Click the File menu, select the Info tab, and select the Protect Presentation button.
- Select Encrypt with Password from the drop-down menu.
- Enter your password, re-enter your password, and then click the OK button.

Back to Top
Open a password-protected Microsoft PowerPoint presentation.
- Navigate to and open the password-protected Microsoft PowerPoint presentation you want to open.
- Excel will launch, and you will be prompted to Enter a password to open file in the Password window.
- Enter the password you set for the file, and click the OK button.

Back to Top
Zip and Password Protect a Folder using 7-Zip
Compress and Password Protect Folders Using 7-Zip
You will need to download and install the 7-Zip file archiver before following the steps below.
- Select the folder you want to include in your password-protected .zip archive.
- Right-click on the folder, then hover over the 7-Zip option with the cursor. This will expand the context menu.
- Select the Add to archive... option.
- Enter and reenter the password in the Encryption section by typing it in the respective fields.
- If desired, you may select an encryption method using the drop-down menu.
- Click the OK button to create the .zip archive with password protection.
- A quick status bar will display, showing the progress of the compression and encryption.
- The compressed file with the filename of the original folder, followed by the .7z suffix, will display in the same root folder in which the original file was located.

Back to Top
Open Password Protected Folders using 7-Zip
- Navigate to the compressed file you would like to extract.
- Right-click on the file, hover over the 7-Zip option with the cursor, and select Extract Files... from the menu.
- Choose where you want the files to extract by clicking on the three dots to the right of the Extract to: field.
- Enter the password for the file in the Password field.
- Click the OK button, and the compressed file will extract to the location you selected.

Back to Top
Password Protect Office 365 Files on Mac
Password-protect a Microsoft Word document on Mac.
- Go to Review > Protect Document.

- Under Security, you can select whether to enter a password to open the document, modify the document, or both. Enter each password again to confirm.
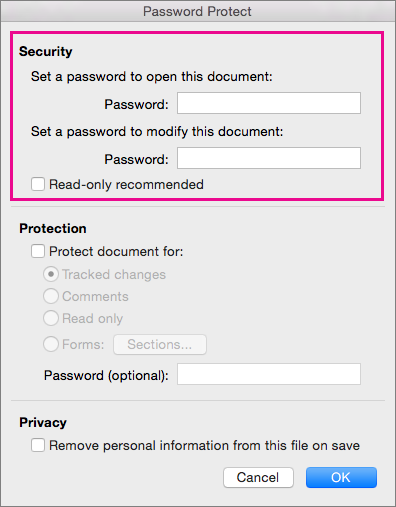
-
Click OK.
Back to Top
Open a password-protected Microsoft Word document on Mac.
- Find the file you would like to open and double-click on it.
- You will be prompted to Enter the password to open this file in a new Password window that displays.
- Enter the password in the field and click the OK button.

- The password-protected document will open.
Back to Top
Password-protect a Microsoft Excel spreadsheet on Mac.
- Open the sheet that you want to protect.
- Click File > Passwords...

- Enter the password in the Password to open field and click the OK button.

- Enter the password again Confirm Password window and click the OK button.

- The spreadsheet is now password protected.
Back to Top
Open a password-protected Microsoft Excel spreadsheet on Mac.
- Find the file you would like to open and double-click on it.
- A new Password window will display, prompting you for the password to open the Excel spreadsheet.
- Enter the password and click the OK button.

- The spreadsheet will be unlocked, and you will be able to edit the spreadsheet.
Back to Top
Password-protect a Microsoft PowerPoint presentation on Mac.
- Click File > Passwords.

- Under Password to open, select the Encrypt this presentation and require a password to open check box.

- In the Set a new password box that opens, type and verify your password in the corresponding fields, and then click the Set Password button.

- Click OK, and then save your presentation.
Back to Top
Open a password-protected Microsoft PowerPoint presentation on Mac.
- Find the file you would like to open and double-click on it.
- A new Password window will display, prompting you for the password to open the PowerPoint presentation.
- Enter the password and click the Open button.

Back to Top
Compress, and Password Protect a Folder on Mac
Encrypt a folder on Mac using Disk Utility
Disk Utility can create an encrypted file known as a disk image. It is similar to a zip file but utilizes the strongest Mac encryption method.
- Use Spotlight (push ⌘+space or click on the magnifying glass icon on the upper right corner of the menu bar to use Spotlight and type in Disk Utility, and press Enter to open.
- Alternatively, you can open Disk Utility it from the Applications > Utilities folder.
- Click on the File menu and, select New Image > Image from Folder... .

- Choose the folder you want to encrypt, and click the Choose button.

- Enter a name and select where in OneDrive to save the disk image.
- Choose an encryption level of 128-bit or 256-bit.

- 128-bit encryption is faster and recommended.
- Click the Save button and then enter a secure password into the Password field and again into the Verify field.

- Warning: if you cannot recall this password, then you will not be able to open this folder.
- If it seems like the disk image is stuck during this process, keep in mind that larger-sized files can take more time to encrypt.
- The process will alert you when done. Click the Done button.

Back to Top
Opening an Encrypted Folder on a Mac
- Navigate to your OneDrive folder and double-click on the .dmg file of your compressed and encrypted folder.
- You will be prompted to enter your password and click the OK button.

- The encrypted folder will mount as a new drive on your Desktop with the folder contents.

- Please note that to compress, encrypt, and edit this content, you must follow the steps under Encrypt a folder on Mac using Disk Utility once again.
Back to Top