Table of Contents:
Signing into Zoom
Through the Web Portal
Stonehill maintains a small number of Zoom licenses for Graduate and Professional Studies programs. If you are teaching a current course in one of those programs, here is how you can activate your Stonehill Zoom account:
- Navigate to stonehill.zoom.us.
- Click Sign in.

You will be redirected to a Stonehill.edu sign in page: login with your Stonehill credentials. If this is the first time signing into the Zoom portal, you will be asked to verify your email address. Check your email and find the Zoom activation email. Click the link in the email and choose Sign in with SSO, put Stonehill in the company domain if asked. Once you successfully sign in, your account is now active and you will be brought to your Stonehill Zoom dashboard.
Back to Top
Zoom Desktop Client
- Make sure you have downloaded the Zoom Desktop Client.
- Click Sign In with SSO.

- Type the word "stonehill" in the domain field, if it isn't already there.
- Click Continue. You will be redirected to your Stonehill.edu to sign in with your Stonehill Credentials. After signing in, you will be redirected back to the Zoom Desktop Client, where you should now be signed in.
Back to Top
Zoom Mobile App
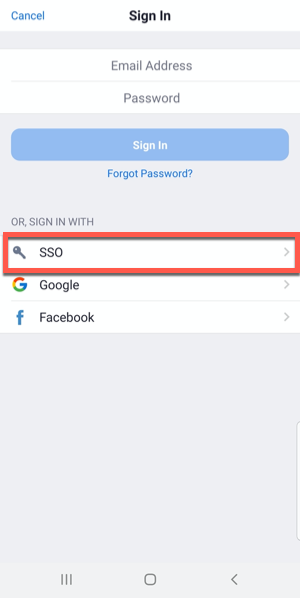
- Tap SSO.

- If prompted, type Stonehill in the company domain field.
- Enter your Stonehill email address.

- Tap Continue.
You will be redirected to Stonehill.edu to sign in with your Stonehill credentials. After signing in, you will be redirected back to the Zoom Mobile App.
Back to Top
Downloading the Zoom Client
- When you first start or join a zoom meeting you will be prompted to launch the meeting. At this point, you would click the download & run Zoom link if you don't already have it.

or
- You can download the Zoom Desktop Client for Mac, Windows, ChromeOS, and Linux, as well as the Zoom Mobile App for iOS and Android from the Zoom Downloads page.
Back to Top
Updating the Zoom Client
In order to run Zoom with the most secure and newest features, it's best to keep the program up to date. The IT Department maintains regular Zoom updates, but sometimes, you may miss a cycle.
To make certain you are running the most current version of Zoom, follow the steps below:
- Launch the Zoom client.
- Click on your Zoom profile icon and select Check for Updates from the menu.

- If an update is available, Zoom will automatically begin downloading the update.

- Once the update is downloaded, click the Update button that displays to update your Zoom client.

- The Zoom Updater status bar will display the installation status.

- Zoom will re-launch in the latest version.
Back to Top
Zoom Home Tab
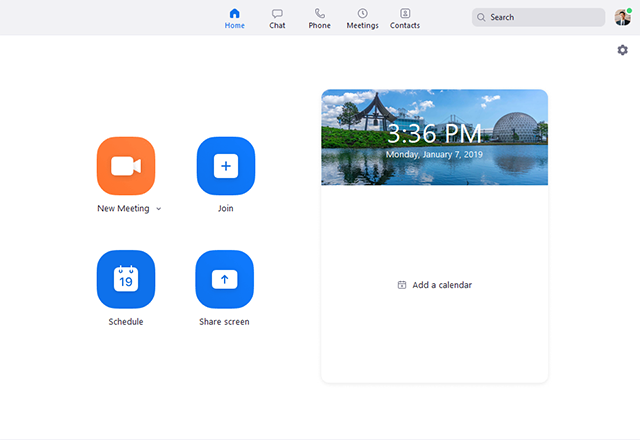
After signing in, you will see the Home tab, where you can click these options:

- New Meeting: Start an instant meeting. Click the downwards arrow to enable video or use your personal meeting ID (PMI) for instant meetings.
- Join: Join a meeting that is in progress.
- Schedule: Set up a future meeting.
- Share Screen: Share your screen in a Zoom Room by entering in the sharing key or meeting ID.
- Date and time with background image: To change the background image, hover over the picture and click the camera icon.
- Upcoming meeting: Displays the next meeting for the current day. Add a third-party calendar service if you want to sync upcoming meetings.

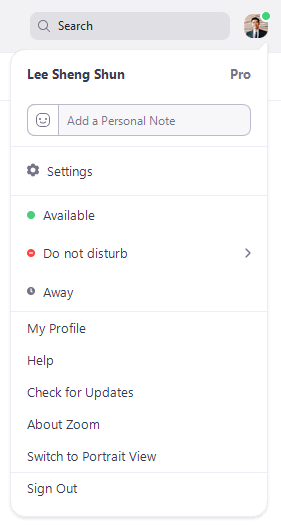
- Click your profile picture for these options:

- Add a personal note.
- Settings: Access settings you can change in the client.
- Change your status to Available, Away, or Do Not Disturb.
- My Profile: Open the Zoom web portal to edit your profile.
- Help: Open the Zoom Help Center.
- Check for Updates: Check if Zoom is up to date.
- About Zoom: View the current version.
- Switch to Portrait View: Switch the Zoom window to portrait view if you prefer a narrower window.
- Sign out
Back to Top
Zoom Video Tutorials and FAQ
Zoom's help center provides specific video tutorials on how to join a meeting, scheduling a meeting, audio/video settings, and more. They also provide a comprehensive Frequently Asked Questions page to resolve common troubleshooting issues. To access these pages click the corresponding links below.
Back to Top